Friday 13 December 2013

Barbie Doll Princess & Minion Cake

Barbie Doll Princess & Minion Cake


This year I finally made a Princess Cake for my little girl's 6th Birthday!  I can still remember the stress and fear of not being able to make it.  Here is the Princess Cake for her celebration in class!  :)


After her celebration in school, we brought her out for lunch and to shop for her birthday present.  Back home, with the remaining cake base, I decided to decorate another cake for our family celebration that evening.  It was tiring but fulfilling indeed!


Mooncakes 2013

These are the mooncakes I made last year.  Lots of preparation is required but I enjoy the process of making it.  

Traditional Mooncakes  传统月饼  - 10 September 2013
(Recipe source: Jessie-CookingMoments)

Makes 5
“Skin” Ingredients:
150g Plain Flour
90g Golden Syrup
3/4tsp Alkaline Water
42g Vegetable Oil


Filling Ingredients:
5 x 100g Lotus Paste, store-bought
5 x 5g Pre-roasted Pumpkin Seeds

*Grab 1 portion of pumpkin seeds & 1 portion of lotus  paste, roll into a ball.  Repeat for the rest*

Egg Wash Ingredients:
1 Small Egg + 1tbsp Water

*Whisk until well-combined.  Pass through a fine sieve.  Set aside.*
Method:

  1. To make the “skin,” mix golden syrup, oil & alkaline water with a whisk until well-combined.
  2. Place flour in a big bowl, make a well in the center. 
  3. Pour (1) into the flour. Mix with a spatula until a soft pastry is formed.
  4. Wrap with cling wrap & rest for 40 minutes.
  5. Divide dough into 5 equal portions,  53g - 56g each. Roll into balls.
  6. Grab one dough, flatten into a disc, then wrap a filling inside.  Roll into a ball again.
  7. Dust mooncake mould with some cake flour. Pour out the excess.
  8. Place the dough ball in the center of the mould. Gently press from the center until the dough fill up the entire mould. Release the ring & unmold carefully. Place the mooncake on a lined tray.
  9. Repeat for the rest of the ingredients.
  10. Bake in a 160C-preheated oven at lower middle level for 12 minutes.
  11. Remove to cool down for 10 minutes. Reduce temperature to 150C.
  12. Bake for 8 minutes.  Remove to cool down for another 8-10 minutes. Brush egg wash on all sides of the mooncakes.
  13. Bake for another 3 minutes or until the egg wash are dried & the mooncakes look golden.
  14. Remove to cool down on a wire rack completely. Wait for 2-3 days for the mooncakes to become soft again before consume(and taking photos).


One day later....


Snowskin Mooncake - 12 Sep 2013
Recipe source : Aunty Yochana


Ingredients:
90 gm. fried glutinous rice flour (Kao fen)
10 gm. tang mien flour
30 gm. shortening
40 gm. icing sugar
200 gm. ice-cream soda or 7-up
little pandan, pink, lemon yellow colouring

Filling:
600 gm. lotus paste

30 gm. melon seeds
Method:

  1. Sift the glutinous rice flour and wheat starch into a mould.
  2. Add in icing sugar and shortening and mix till thoroughly mixed.
  3. Pour in ice-cream soda and mix into a soft pliable dough.
  4. Divide dough into 4 portions. Add colouring to each portion, leaving one portion white.
  5. Place each dough between plastic sheets and roll into a rectangular flat piece of the same size. Stack the dough on top of one another, then roll into a swiss roll.
  6. Cut into 6 equal pieces. Divide the lotus paste fillings into 6 portions.
  7. Roll the spiral part into a flat piece and wrap with lotus paste filling. Press into a mooncake mould then knock out.
  8. Chill before serving. 
Below are some repeated bakes using the same recipe as above..


Traditional Baked Mooncakes with a little piggy made with the leftover dough  - 15 Sep 2013 


19 Sep 2013 - Final bakes before Mid Autumn Festival


Ang Ku Kueh

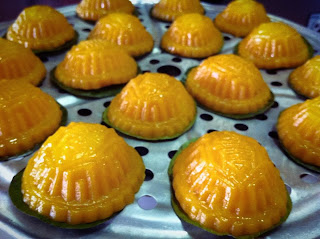
Tried out 2 types of Ang Ku Kueh using natural colours, beetroot for red and sweet potato for yellow.

12 July 13 - Beetroot Angku Kueh
(Recipe source: Reese Kitchen)


Ingredients:

Skin
200g Sweet potatoes / Pumpkin / Beetroot(cooked n mashed/blend)
300g Glutinious flour
1 tbsp Rice flour
2 tbsp Sugar
3 tbsp Cooking oil
200ml Water (fr cooked potatoes)-might not need tat much, so have to add slowly.


Paste
250g Green beans/Mung beans (yellow in color)
140g Sugar
4 tbsp Cooking oil
* Cut some banana leafs according to the mould using (for the base of the kuih) when steaming!

Method (paste):
Soaked the beans at least 2 hours n rinsed.
Steam the beans for 45-1hr, with pandan leafs on top if desire
While its still hot, add in oil & sugar, blend till fine
Make into small balls. (can be kept for a month in freezer)


Method (pastry):
Mixed all ingredients by hand
Make into a dough, leave for 20-30 minutes
Grab a portion (as the mould using) then wrapped in the paste(ball)
Dust the mould with some rice flour before pressing in the dough.
Knock out & place on the cut & oiled banana leafs.
(Brush a little oil on top of the (cut) banana leafs before placing the kueh on top)
Use a steamer to steam for 8-10 minutes (medium heat)-medium size
5-8 minites (medium heat) - small size
~ When its done, brush a little oil on top of each kueh, this is to prevent the kueh from sticking together.


24 July 13 - Sweet Potato Ang Ku Kueh
(Recipe source: Nasi Lemak Lover)


Ingredients*makes 40pcs, mould size 4cm x 5cm
Sweet Filling250g split yellow mung beans/green beans
140g sugar
3tbsp corn oil
Method1. Rinse mung beans several times till water run clear, soak in clean water for 2hours.
2. Drain the mung beans, place beans on a steaming tray, steam over high heat for 30mins
3. While beans still hot, place beans, sugar and oil in a food processor, process till fine.
4. Set aside to cool. Shape into 13g small ball.
Sweet Potato dough or skin300g sweet potatoes (Indonesia orange sweet potatoes), cut into small pieces
200g glutinous rice flour
1tbsp rice flour
2tbsp sugar
3tbsp corn oil
130g hot water, or adjust accordingly
Few drops of red food colouring, optional
Method1. Steam sweet potatoes till soft, about 15mins.
2. Use a fork, mashed cooked sweet potatoes and set aside to cool.
3. Add glutinous rice flour, rice flour, sugar, and corn oil with mashed sweet potato, slowly add in hot water to mix well till soft dough, keep aside and rest 10mins.
4. Shape into 17g small ball.
To shape and steam AngKu Kueh1. Dust “Ang Ku Kueh” mould with glutinous rice flour for easy to remove the kueh OR you may also grease with corn oil (a bit difficult to remove kueh but end result is less oily on the skin)
2. Flatten the sweet potato ball, place a mung bean ball, cover and shape into round ball.
3. Place the ball in the mould, lightly flatten, then knock out and place on greased banana leaf.
4. Arrange kueh on a steaming tray and steam for 5-6mins over medium low heat till cooked (do not steam over high heat to prevent it turned out of shape!). Once done, remove from steamer, lightly brush kueh surface with corn oil (you may omit this step if you follow to grease mould with corn oil in step 1).


Lapis Sagu 九层糕

I love eating this kueh since young.  Whenever I go to Bengawan Solo, this will always be my choice.  So, when I saw Alan Goh's blog post on Lapis Sugu, I bookmarked it immediately.  The photos of the kueh he posted were so beautiful and he made the whole process looks so do-able.   Knowing that the process of making it is time consuming, I waited patiently for the right time to do it.  Recently, I saw a lot of postings on Lapis Sugu on facebook using this recipe.  So, with the long holidays in mind, I finally got all the ingredients ready and made it on National Day!
I made half the recipe hoping to quicken the whole process.  :P  But because of the size of my wok, I was not able to use the 9x9 inch square tin for steaming. Instead, I did mine using a smaller round tin.  I spent a total of 3.5 hours for the whole process while watching the National Day parade.  And after more than 6 hours of cooling down (it was already 2am by then), I sliced it and was greeted with a pretty Lapis Sugu! My kids loved the kueh too though my husband and mother commented that the coconut taste was not fragrant enough.  This could be because I used only coconut milk instead of mixing with coconut cream in my recipe.  But overall, I am happy with it.  Great thanks to Alan for his kind sharing!


Below is the recipe taken from Alan Goh’s blog. I’ve half the recipe to record the exact quantity I did. You may wish to refer here for the full recipe and the useful notes.
Ingredients ( for a 9 x 9 ” square tin)
240g         Tapioca flour
75g           Sago flour
18g           Mung Bean flour
25g           Rice flour
360ml       Thick coconut milk (I used normal chilled coconut milk)
325g         Sugar
500 ml      Water
3-4            Pandan Leaves, knotted
Pinch        Salt
Food colouring (red and green)

Method
  1. Boil sugar with pandan leaves in 500ml of water until sugar melts. Strain the syrup and dilute with water to make to 750ml.
  2. Mix all the flour and salt together. Pour coconut milk a little at a time and mix till smooth. Set aside.
  3. Pour the syrup from (1) into the flour mixture. Stir constantly till well blended.
  4. Divide mixture into 3 portions. Leave one portion uncoloured. Mix each of the other 2 portions with red and green colouring.
  5. Grease a 9″ square baking tin with a little oil. Place the tin in a steamer and steam until hot. Pour in the uncoloured mixture (90g – I used a ladle almost to full scoop) and steam for about 8 mins.  Repeat another layer with the uncoloured mixture.
  6. Repeat step (5) with other coloured batter until all batter is used up. Top layer must be red. Leave the cake to cool at room temperature for 7-8 hours before cutting. 


Pumpkin bread & Pumpkin Xi Ban

Truely admire bloggers who share their bakes on their blogs.  A lot of time and effort is needed to maintain a blog.  I lack discipline, that's why I went missing... Hope I can keep updating this blog on what I made in the kitchen.  Below are two pumpkin recipes.

28 July 2013 - 南瓜吐司 Pumpkin Toast
Recipe source : 厨苑食谱


材料:
300克高筋面粉
1小茶匙盐
2大匙幼糖
1小茶匙干酵母
2大匙奶粉
150南瓜泥
110毫升鲜奶
35克奶油
做法:
1。混合所有的材料除了奶油, 5分钟后才加入, 搓10-12分钟。
2。用中速搅拌机搅拌至光滑。
3。把面团搓成圆团,将面团放在面包模里,盖上一块湿布,发酵1 ½ 小时至9分满,封盖。
4.放入预先烘热的烘箱里,烘烤170度30分钟。


21 July 2013 - 金瓜喜粄
Recipe source : 厨房找快乐


材料:

125g        面粉(过筛)
125g         糯米粉(过筛)
75g          细砂糖
3g         即溶酵母
130g         南瓜(蒸熟压泥,放凉待用)
115ml         清水
15g         粟米油
适量         香蕉叶

做法:
1)酵母溶于清水内,拌匀。

2)香蕉叶事用火炉(小火)微烧变软,剪成方形。 3)面粉,糯米粉,白糖,南瓜泥及 酵母水混合搅拌搓成团(水份慢慢加入)。
4)再把油分次加入加入油,揉匀。
5)把面团直接分成小状(50g),在掌心抹上少许油,用滚圆法,把小面团滚圆。
6)将滚圆小面团放在蕉叶上,用掌心轻压按扁,待发25-30分钟。(或至表面有弹性)
7)用中火蒸12分钟,在锅盖打开小缝约5分钟,才取出喜板放置凉架待凉。


Friday 2 August 2013

Sweet Potatoes Soup & Ondeh Ondeh


Perhaps I should start off my post with the most recent kueh I made.  

As I was on leave on Tuesday for my girl's Primary 1 registration, I dropped by the market to buy some sweet potatoes and freshly grated coconut.  With the two sweet potatoes, I decided to use some for my sweet potatoes soup.


Then with the remaining sweet potatoes, I started making my ondeh ondeh!

Sweet Potatoes Ondeh Ondeh  (I tried out with half recipe which makes 16)
(Recipe source : Travelling Foodies)


Ingredients
330g sweet potatoes
135g glutinous rice flour
80 ml tepid water
150g gula melaka
50g grated coconut
1 pinch of salt
2 pandan leaves

Method
Peel and slice sweet potatoes and steam for around 20-30 min or until soften.
While waiting for the sweet potatoes to steam, chop gula melaka finely to an almost crumb-like texture.
Once the sweet potato is done, place grated coconut into a dish with crushed pandan leaves, sprinkle and toss in pinch of salt and steam for around 15 min. This is to cook the coconut to prevent it from going rancid too quickly.
While waiting for the coconut to steam, work on the dough first mashing the sweet potatoes in a large mixing bowl. This is done traditionally with the back of a fork but a potato ricer, masher can also be used. Process the sweet potato until no lumps are observed and develop a smooth pulp-like texture.
To the sweet potato mash, add glutinous rice flour followed by tepid water. The warm water should not be added all at once but over 2-3 sucessions, rubbing and kneading in the dough, sweet potato mash and water together between each addition to form a dough. 80 ml of water only serves as a gauge as it really depends on the level of moisture the sweet potatoes have. Stop adding water when the dough becomes firm and pliable.
Divide the dough equally into small pieces, each 15g. Flatten each piece of dough with your thumb and place approximately half a teaspoon (about 5 g) of gula melaka inti in the centre. Cover the filling and wrap tightly. If necessary, dust your palms and fingers with a little glutinous rice flour to prevent the dough from sticking.
Bring a pot of water to a boil before lowering the flame to a very gentle simmer. Place the glutinous rice balls gently into the water, stirring gingerly to swirl the water around and prevent the dough balls from sticking to the bottom of the pot. The water must be barely simmering, gently cooking of the dough balls to prevent them from bursting and at the same time, prolonging the cooking time for the gula melaka filling to melt completely.
Remove the cooked balls which float up and drain slightly over a perforated spoon or a fine wired sieve before rolling them over the dish of grated coconut.
Serve immediately.
The ondeh ondeh was really yummy.  If I were to make this again I hope I can try out using grated coconut (with gula melaka) as filling.  


My new blog!

Finally… this blog was created after much delay, to track my bakes!  

I love baking since schooling time.  Home Economics lesson is the only time I get to bake since I do not have an oven at home.  When my husband and I got our own flat, he bought an Ariston oven built in at our very own kitchen. We did try to do some baking many years ago… yummy kueh bangkit, pineapple tart, mooncakes & pandan chiffon cakes… We didn’t manage to get the pandan cake right cake at that time.  After several failed attempts, we, or rather, I gave up baking, completely.  Since then, my oven was left idle and perhaps due to too much idling, it caused a power trip each time we turn on the power.  


It was until October 2011 that I started to bake again after an electrician taught my husband how to revive our oven.  


So, I started my first bake with my little girl on children’s day, a premix cake, the fairy cupcakes!  And she loves it!  From then on, I bake whenever possible, while the little ones were having their afternoon nap or late at night.   Sometimes, I even took leave to do a bake!  


I am so happy to find so many baking blogs on the website and I really get to learn a lot from all of you out there who are willing to share! Thanks everyone! In order to track my bakes, I may start off with some previous bakes.  Will really appreciate if all the experts out there can advice and share so that I can improve on my bakes! Thanks again!